Homework 0
Introduction
This assignment gets you started with the basic tools you will need to complete all of your homework projects. This project will ensure that you have correctly installed Scala, SBT and IntelliJ.
Problem Description
You are a student who needs to install all the tools necessary to get started in CS2340.
Solution Description
In this assignment you will set up your computer to
- create and run Scala scripts from the command line,
- create and manage Scala projects from the command-line with SBT, and
- create and manage Scala projects with IntelliJ.
Scala Scripts
-
Install Scala for system-wide use on your computer by downloading the appropriate distribution from the bottom of https://www.scala-lang.org/download/
-
Download and install a programmer’s text editor (you can also use IntelliJ as a general text editor, but it can be awkward for quick file editing). In this course we will prmiarily use IntelliJ, but it’s important to be comfortable with general-purpose text editors too.
- Create a directory for your CS2340 coursework somewhere on your hard disk – we suggest
cs2340.- You can do this on the command line by navigating to the directory you want to contain is the cs2340 folder (using the
cdcommand).- Create the folder with the command
mkdir cs2340. - Enter the new folder with the command
cd cs2340. - Note: avoid putting spaces in file and directory names, since doing so complicates the use of some command line tools.
- Create the folder with the command
- You can do this on the command line by navigating to the directory you want to contain is the cs2340 folder (using the
-
Create a subdirectory of your
cs2340directory namedhw0. -
On the command line, make sure you are in the
hw0folder. Enter these commands (remember that ‘$’ is the shell prompt (something like ‘C:\cs2340\hw0>’ on Windows) – don’t type the shell prompt character(s)):$ scalac -version > hw0-output.txt $ scala -version 2>> hw0-output.txtPlease note what is happening here:
>redirects the standard output of a program.2>(or2>>) redirectsstderr, which is used for diagnostics (such as version strings). The first line creates thehw0-output.txtfile, and the second line (with the extra>) adds more text to the file. Here is a nice discussion of the file descriptorsstdin,stdoutandstderr.What this means is that
>(or2>) will overwrite the file, so if you go back to repeat the first step, you’ll need to repeat all the other steps as well. -
Open your text editor and create a file in your newly created
hw0directory namedNimblyBimbly.sh(on Unix/Linux) orNimblyBimbly.bat(on Windows) and enter the following Scala script:Unix/Linux:
NimblyBimbly.sh#!/bin/sh exec scala -savecompiled "$0" "$@" !# for (i <- 1 to 9) print("\u004D\u0065\u006F\u0077 ") println("...") println("\u004D\u0065\u006F\u0077 ")Windows:
NimblyBimbly.bat::#! @echo off call scala -savecompiled %0 %* goto :eof ::!# for (i <- 1 to 9) print("\u004D\u0065\u006F\u0077 ") println("...") println("\u004D\u0065\u006F\u0077 ") -
If you’re on Unix/Linux, make the script executable by entering
chmod +x NimblyBimbly.shon the command line. - On the command line, go to the directory containing your newly created script and run it by entering
./NimblyBimbly.shon Unix/Linux orNimblyBimbly.baton Windows. You should see some output on the console. -
Run the script again and add its output to
hw0-output.txtby enteringUnix/Linux:
$ ./NimblyBimbly.sh >> hw0-output.txtWindows:
C:\cs2340\hw0> NimblyBimbly.bat >> hw0-output.txtDon’t forget the the double arrows in
>>! - Examine your
hw0-output.txtfile to ensure that it contains thescalacversion string, thescalaversion string, and the output of running yourNimblyBimblyscript.
Command-line SBT Projects
-
Install SBT for your operating system using the instructions linked on the Getting Started with Scala and SBT on the Command Line page on docs.scala-lang.org.
-
In your
hw0directory, run the following commandsbt new scala/hello-world.g8. This pulls the ‘hello-world’ template from GitHub, prompts for project template values, and creates a starter SBT project. -
When prompted, name the application
hello-world. This will create a project called “hello-world” in a subdirectory namedhello-world. -
cdto thehello-worlddirectory and examine the files and directories created by thesbt newcommand and do the things listed on the Getting Started with Scala and SBT on the Command Line page on docs.scala-lang.org to get familiar with SBT. -
Copy the first non-comment, non-blank line from
hello-world/build.sbtand paste it to the end of yourhw0-output.txtfile.
IntelliJ SBT Projects
Note: be sure to install the Scala plugin in IntelliJ.
-
Do the steps on the Building a Scala Project with IntelliJ and SBT page on docs.scala-lang.org with the following modifications:
- You’ll be starting with Step 2 since you already created an SBT project outside of IntelliJ (which is how we’ll always do it).
- In the latest IntelliJ version the menu option to import an existing project is File -> New -> Project from existing sources …
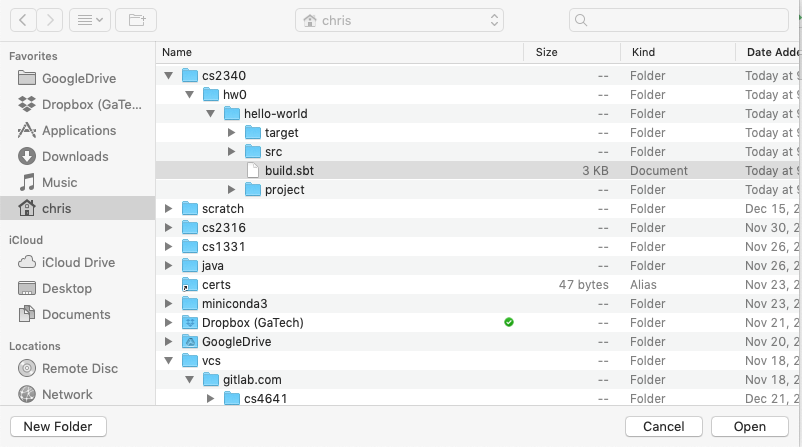
- In the File Open dialog find the
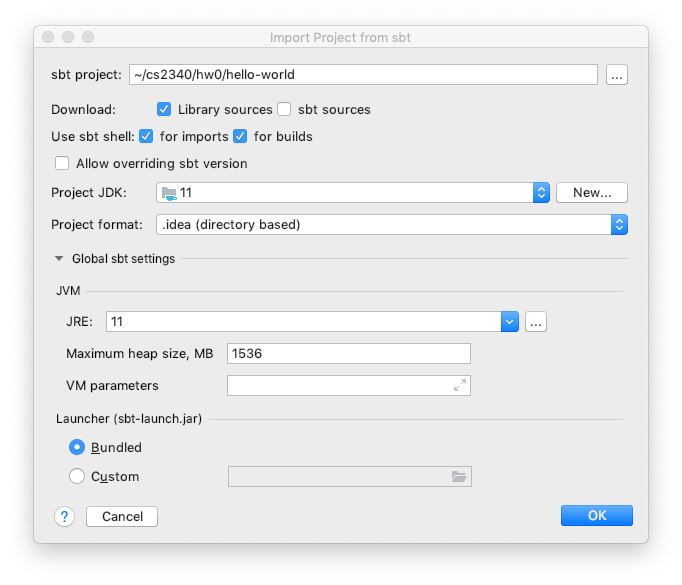
build.sbtfile created in the previous section. Your File Open dialog may look something like this: - In the “Import Project from sbt” dialog under “Use sbt shell”, check both “for imports” and “for builds”. Your “Import Project from sbt” dialog may look something like this:
-
You may have noticed that the
scala/hello-world.g8template creates a project that uses Scala 2.12.7 and SBT 1.2.4. During the course of a Scala project you may update your Scala version or SBT version. Here’s how to update build settings (like the Scala version) and keep IntelliJ in sync (see also JetBrain’s help page for sbt projects). Do these steps:- In the sbt shell execute the command
scalaVersion, which tells you the version of Scala sbt is using to compile and run your project. The version should be 2.12.7. - Open
build.sbtand update the Scala version (the value of the settingscalaVersion) to the most recent stable release (2.12.8 as of January 2019). - Open the
sbttool window on the right and click the refresh button in the top left corner. The SBT shell will open and show the progress of the update.
Note: You may also want to update the SBT version of an existing project, but to do that you’re better off simply updating the SBT version in
project/build.properties, deleting the.ideasubdirectory (which contains the IntelliJ project), and re-importing the project frombuild.sbtinto IntelliJ as in Step 1 above. - In the sbt shell execute the command
-
After performing the substeps of Step 2 above, in the sbt shell execute the command
scalaVersionagain. Copy the command’s output (which shows the updated value forscalaVersion) and paste it to the end of yourhw0-output.txtfile.
Double-Check your hw0-output.txt File
At this point your `hw0-output.txt file should contain
- your
scalacversion string, - your
scalaversion string, - the output of your
NimblyBimblyscript, - the first non-comment, non-blank line from
hello-world/build.sbt, and - the line from the the output of the sbt shell command
scalaVersionshowing an updatedscalaVersionfor thehello-worldproject. This line should start with[info]and show the most recent stable Scala version.
If your hw0-output.txt file is missing any of those elements you should redo all the steps that add content to hw0-output.txt in each of the previous sections.
Turn-in Procedure
Submit your hw0-output.txt file on Canvas as an attachment. When you’re ready, double-check that you have submitted and not just saved a draft.
Verify the Success of Your Submission to Canvas
Practice safe submission! Verify that your HW files were truly submitted correctly, the upload was successful, and that your program runs with no syntax or runtime errors. It is solely your responsibility to turn in your homework and practice this safe submission safeguard. NOTE: Unlike TSquare, Canvas will not send an email indicating that your assignment has been submitted successfully. Follow the steps outlined below to ensure you have submitted correctly.
- After submitting the files to Canvas, return to the Assignment menu option and this homework. It should show the submitted files.
- Download copies of your submitted files from the Canvas Assignment page placing them in a new folder.
- Re-run and test the files you downloaded from Canvas to make sure it’s what you expect.
-
This procedure helps guard against a few things.
- It helps ensure that you turn in the correct files.
- It helps you realize if you omit a file or files. Missing files will not be given any credit, and non-compiling/non-running homework solutions will receive few to zero points. Also recall that late homework will not be accepted regardless of excuse. Treat the due date with respect. Do not wait until the last minute! (If you do discover that you omitted a file, submit all of your files again, not just the missing one.)
- Helps find syntax errors or runtime errors that you may have added after you last tested your code.